Microwaved thin egg sheets (usuyaki tamago)
Japanese recipes sometimes call for thin sheets of egg omelette (usuyaki tamago) as a garnish (think hiyashi chuka cold noodles, chirashi zushi scattered sushi, or little shapes cut out of the egg with cutters), or as a decorative wrapper for fried rice or little rice ball purses. Think of them as a low-carb alternative to flour-based wraps or nori, for those who don’t like the flavor of seaweed. I’ve made these egg sheets in frying pans before, but it takes practice and technique to turn out an attractive result. Unless I’m using a slick, perfectly non-stick pan just for eggs, my efforts are doomed to failure and I’m left looking at an ugly pile of egg scraps. Very frustrating. When I was browsing speed bento cookbooks in a Japanese-language bookstore recently, though, my friend Mami-chan volunteered that she whips up thin egg sheets on a plate in the microwave all the time for her son’s bento lunches. I was intrigued. Was there an easier, faster way to make thin egg sheets using the microwave oven?
I did some research into Japanese-language recipes and techniques, and found that there are some tricks to producing a good microwave version of this classic. Plate selection is crucial, and seasoning is key to making something tastier than just thin scrambled eggs. (Read on for the full recipe, tutorial, freezing instructions, and a review of microwave-safe plastic wraps.)
TIP: You can make these in advance and freeze them for a speedy shortcut on time-pressed mornings (freezing directions follow the recipe).
Microwaved thin egg sheets (usuyaki tamago)
- Makes two to three egg sheets, depending on the size of the plate
- If you’re interested in making the traditional version in a frying pan, there’s a good tutorial here at Just Hungry. Beware of expensive non-stick pans with textured surfaces, though — they don’t release as well as a cheap, slick pan reserved just for eggs. Save your All Clad for something else.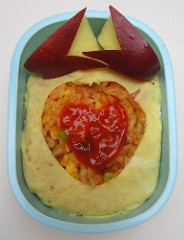
- 1 egg
- 1 tsp sugar
- dash of salt
- 1 Tb water or dashi bonito stock for added flavor (feel free to use instant hon dashi granules dissolved in water, or even chicken or vegetable stock)
- 1 tsp cornstarch, potato starch (katakuriko), tapioca starch or arrowroot starch (optional, but produces a sturdier egg sheet that is well suited to wrapping rice or other foods without tearing)
- 1 tsp vegetable oil (optional)
If you’re using cornstarch, dissolve it in the water or stock to form a slurry. Beat in the egg, sugar, salt and vegetable oil. To avoid white specks in the final product, pass the egg mixture through a sieve. I don’t bother, as you’ll see below.
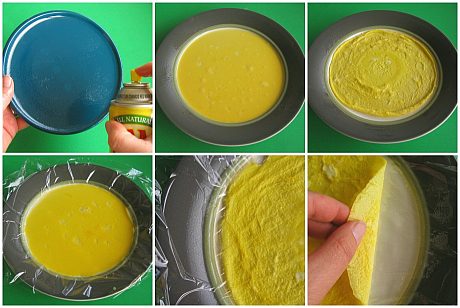
Choose a perfectly flat microwave-safe plate, preferably with a rim to contain the egg. At this point, you can choose to either line the plate with plastic wrap or not. I found the egg was slightly easier to release and work with when it was cooked on plastic wrap, but if you have concerns about microwaving plastic wrap or cooking on it, skip ahead to the directions for cooking directly on the plate.
Ziploc and Saran say that all of their products are completely free of dioxins that could leach into food. From their FAQ: “You also should be aware that dioxins can be formed only when chlorine is combined with extremely high temperatures, such as 1,500°F, which even the most powerful consumer microwave ovens are unable to produce. Our Saran and Ziploc products can be used with confidence when label directions are followed. All Saran Wraps, Ziploc Containers and microwaveable Ziploc Brand bags meet the safety requirements of the U.S. Food and Drug Administration (FDA) for temperatures associated with defrosting and reheating food in microwave ovens, as well as room, refrigerator, and freezer temperatures.” Cooking for Engineers also has an interesting article on microwave-safe containers and wraps.
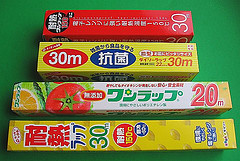 GEAR: This seemed like the perfect opportunity to try out some Japanese plastic wrap made especially to withstand high heat (up to 150 deg. C, or 302 deg. F) and low temperatures (to -60 deg. C, or -75 deg. F). Daiso Japanese discount store (branches internationally) and Ichiban Kan (Japanese-style discount store in the SF Bay Area) both stock these for about US$1.50. These thicker specialty wraps are touted by the manufacturer as being safe for the microwave without leaching dioxins or other chemicals into the food (shown in the photo in the red box on the top and the yellow box on the very bottom, click on the photo for a larger annotated view). The wrap in the red box from Ichiban Kan is comprised of five layers: two polyethylene, two polypropylene, and one fatty acid ester in the middle for high temperatures. The wrap in the yellow box from Daiso is comprised of three layers: one polypropylene sandwiched between two layers of polyethylene. Also pictured is antibacterial vinyl chloride plastic wrap for maximum food safety (second from the top, from Daiso) and an additive-free polyethylene plastic wrap (third from the top, from Ichiban Kan) advertised as not leaching dioxins into food. All of these plastic wraps come with warnings to leave some space between the wrap and food when microwaving items high in fat or oil, as plastic has a high affinity for fat.
* * *
With Plastic Wrap:
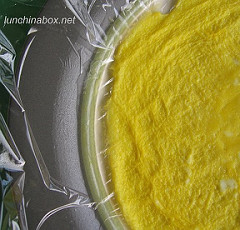
Line the plate smoothly with a sheet of plastic wrap, and pour half of the egg mixture onto the plate (right on top of the plastic wrap).
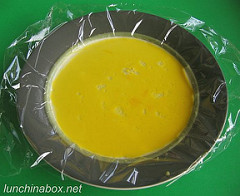
Cook at your microwave oven’s equivalent of 500W to 600W for approximately one minute, or until the egg in the center of the plate is cooked through. My microwave oven is a 1200W model, so I reduced the power level to 50% to compensate. You may need to experiment with power levels and cooking times. If the center is still runny when you pull it out, return the plate to the microwave and cook it a little longer until the egg sets. Try not to overcook as this leads to rubbery eggs.
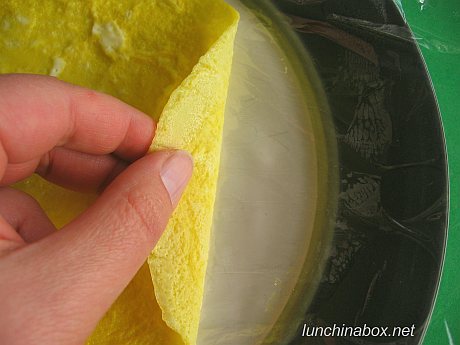
Once the egg has cooked, you should be able to slowly peel it from the plastic wrap. If you’re using the egg sheet as a wrapper, you may find it easier to keep the egg on the plastic wrap while moving it and shaping in order to avoid tears. If you’re going to julienne the egg to use in another dish, roll it into a cigar shape or fold into thirds, and cut into even strips.
* * *
Without Plastic Wrap:
Spray a clean, flat plate with vegetable oil cooking spray, or wipe the plate with a lightly oiled paper towel.
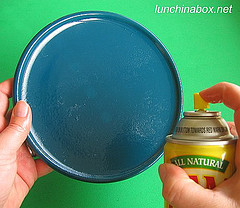
Pour half of the egg mixture onto the oiled plate and cook in the microwave according to the directions above.
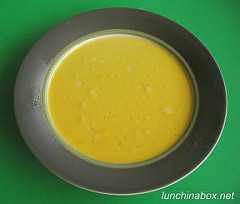
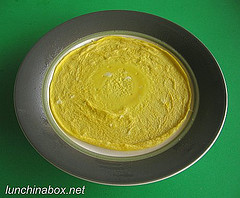
This was a somewhat successful attempt, but you can see in the center where the egg had not set when I removed it, so I put it back in the microwave for another 20 seconds to finish cooking.
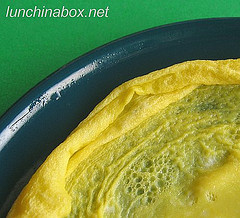
Depending on the plate you choose, you may see some curling around the edges where the egg meets the plate rim. The blue plate had a more pronounced angle to the rim, so it wasn’t the best plate for this (see the resulting curling below). The un-oiled plastic wrap seems to help the egg stay in place without curling.
Storage:
You can wrap and freeze the egg wrappers for a quick prep shortcut (use within a month for optimum quality), or refrigerate for a couple of days. To store a whole wrapper, you can either wrap it flat and stack, or roll it up on the plastic wrap as below. To store julienned egg strips, wrap small servings tightly in food wrap.
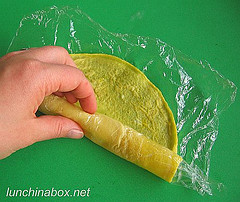
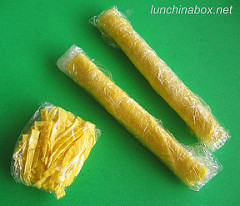
If freezing, place the wrapped egg into a plastic freezer container or freezer bag to avoid freezer burn. To use, let it defrost naturally in the refrigerator. Defrosting in the microwave risks overcooking and turning the egg rubbery — exercise caution if you decide to go this route. (NOTE: Hard-boiled eggs don’t do well in the freezer as they turn spongey, but you can wrap and freeze slices of tamagoyaki or frittata for more lunchtime shortcuts.)
FURTHER READING:
- Japanese rolled omelette (a.k.a. tamagoyaki or dashimaki tamago) (TUTORIAL)
- Shortcut tamagoyaki (Japanese omelette) (TUTORIAL)
- Shaped eggs using common ice cream sandwich molds (TUTORIAL)
- Fried quail eggs in a ladle (TUTORIAL)
- Pasta frittata using leftover pasta (TUTORIAL)
- Scrambled egg purses
- Stovetop mini frittata (RECIPE)
- Biggie’s list of top speed tips, tutorials and equipment reviews
- Subscribe to Lunch in a Box by e-mail updates or via RSS feed


Recent Comments
FAQ
Richard Malakuskie | The Nerdie Birdie | Shaking up the Lunch Routine: Popcorn with Toppings - Popcorn Blog | Justin Wright | The White Plate Kitchen |
Oshibori: We don’t need no stinking wet wipes!Daniel |
Homemade gnocchi box lunches (22)Lisa |
Guide to choosing the right size bento box (82)Julie |
Confessions of an ostrichBernice |
Top Tips (4)miamidish.net | Cheap Seat Eats |
How to make Spam Musubi (69)Scratching Ramen |
School auction bentos with stuffed mushrooms (8)Marci |
Speed Bento: leftover storage and portion guidelinesAdverbios de tiempo |
Fried Shrimp Bentos: Simple vs. Fancy (43)Mimi |
Fruit cup jello jigglers in everyday containers (42)Madison Moms Blog |