
Making okonomiyaki
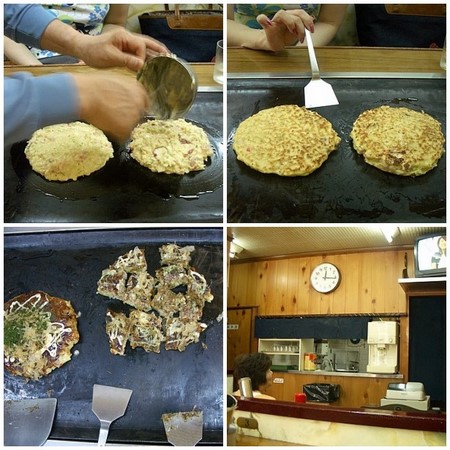
After moving back to the States from Japan years ago, one of the first Japanese foods I craved was okonomiyaki. Essentially a cabbage pancake with a variety of meat or seafood mix-ins and toppings, okonomiyaki is a specialty of Osaka, my old stomping grounds. I’ve got fond memories of little mom & pop okonomiyaki restaurants where customers make their own okonomiyaki at tabletop griddles (photos below), so I set out to recreate the flavors I had there, taught by an Osaka boyfriend’s mom. Okonomiyaki now makes a regular appearance at my table, and I like being able to have a taste of Osaka whenever I like, without depending upon local San Francisco restaurants that don’t make it the way I remember.
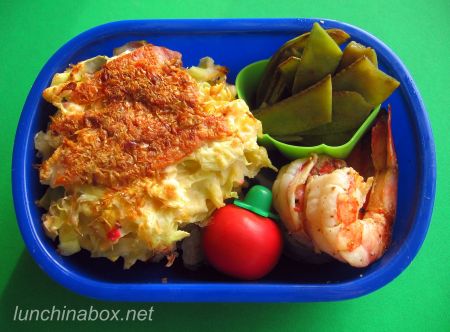
Contents of preschooler lunch: Okonomiyaki (my full recipe below) with British-style lean bacon rashers, container of okonomiyaki sauce, grilled salt & pepper shrimp, and sugar peas with oyster sauce.
Morning prep time: 0 minutes, as I packed everything the night before (4 minutes packing time). I had previously made a batch of mini okonomiyaki when making okonomiyaki for dinner, and froze all of the mini okonomiyaki after wrapping each in plastic wrap and placing in a freezer bag. I put a frozen okonomiyaki right in the bento box the night before and let it thaw naturally in the refrigerator, but you could also thaw them quickly in the toaster, toaster oven or microwave.
Packing: I layered the okonomiyaki two deep, tucked the snow peas into a reusable food cup, and put the okonomiyaki sauce into the tomato-shaped sauce container with the squeeze method (pour sauce into a dish, squeeze the sauce container, release your grip on the container with the opening dunked into the sauce, and let suction fill the container. Repeat until full.). Osaka-style okonomiyaki is usually eaten with a variety of condiments (okonomiyaki sauce , Worcestershire sauce, aonori seaweed, katsuobushi bonito flakes, and mayonnaise), but I cut that down to just okonomiyaki sauce to streamline Bug’s eating process at preschool.

Verdict: Pretty good. Bug ate both of the okonomiyaki during preschool, but left a shrimp and most of the beans. After school he finished the shrimp and a couple more of the beans. I would feel worse if the okonomiyaki weren’t almost all cabbage…
My husband’s lunch: This lunch from last year is an example of an adult portion of four mini okonomiyaki with all of the condiments I like (okonomiyaki and Worcestershire sauces, aonori, katsuobushi and a mayonnaise packet). Packed in large 940ml mens’-style Dear Label bento box with chopsticks built into the lid (by Asvel), and removable divider (removed to fit the okonomiyaki).
Ingredient spotlight: Nagaimo, or Japanese mountain yam, is thought of as an essential component of Osaka-style okonomiyaki, said to produce a tender end product. (Prepackaged okonomiyaki mixes use dried nagaimo or yamaimo powder for the same effect.) A mountain tuber, nagaimo or yamaimo is often grated and served with raw tuna, rice or soba. Grated nagaimo is called tororo, and has a slimy texture reminiscent of raw egg or chopped okra. I’m not a fan of this texture in general, but the sliminess disappears when it’s cooked in okonomiyaki batter. Sliced raw nagaimo is actually a little crunchy, and I quite like it. Some people develop itchy hands after handling raw nagaimo, so you can either wear rubber gloves or soak the peeled nagaimo in water with vinegar to reduce irritation (also prevents the nagaimo from discoloring). I’m not sensitive to it, so I just handle it normally and wash my hands afterwards. Click for the full okonomiyaki recipe and tutorial…
READ MORE:
- Okonomiyaki bento lunch
- Takoyaki tutorial (octopus balls)
- Yakisoba bento lunch
- How to pack a bento lunch and use “gap fillers”
- Biggie’s list of top speed tips, tutorials and equipment reviews
I took the photos below on my last trip to Japan, in a little mom & pop okonomiyaki restaurant with built-in tabletop griddles in Osaka’s Shinsekai neighborhood. Note the small bowl that each okonomiyaki was mixed in at the last minute, and two sizes of metal paddles: the large ones are for cooking, and the small ones are for eating with instead of chopsticks if you like. I usually use chopsticks to eat with, but the paddles are fun. To duplicate the tabletop cooking experience, use an electric skillet and turn it into a communal event.
Osaka-style Okonomiyaki
(serves 4)
- 20g nagaimo or yamaimo mountain yam, peeled and grated (optional but excellent for texture, see notes above)
- scant 1.25 cups flour (160g)
- scant 1.25 cups dashi (190cc) (bonito broth, or water mixed with instant hondashi is fine)
- scant 1/4 tsp baking powder
- 2/3 cup raw fillings (6 oz or 160g) (thin-sliced bacon, bacon rashers, pork bara, chopped shrimp, squid, octopus, kimchi, cheese, etc.)
- 4 eggs
- 3/4 head of a medium cabbage (14 oz or 400g), cut into 2.5″ long, fine julienne strips as if making cole slaw
- 1 green onion, chopped (12-20g)
- 2 Tb dried sakura ebi or suboshi ebi (super-light dried shrimp; I like the sun-dried suboshi ebi for this) (optional)
- 2 Tb benishoga, chopped (red pickled ginger) (optional)
- 1 cup tenkasu (crunchy fried tempura batter bits; if unavailable, substitute Rice Krispies cereal) (40g or 240ml)
- Condiments as you like: Okonomiyaki sauce, Worcestershire sauce, aonori, katsuobushi (dried shaved bonito) , Kewpie mayonnaise , or even a bit of karashi hot mustard mixed into the okonomiyaki sauce if you like it spicy.
- If you have nagaimo or yamaimo, grate it finely until it’s a gooey paste. I used a textured oroshigane grater I usually use for daikon radish (shown above), but you can also use the fine side of a box grater.
- In a medium bowl, add the flour to the dashi bonito stock and whisk together well. Add grated nagaimo and mix to incorporate, then add baking powder and whisk well until there are no lumps and the batter is slightly elastic. Set the batter aside while you prep the rest of the okonomiyaki.
 Remove the tough center of the cabbage, and cut into a fine julienne (2.5″ long). Place shredded cabbage into a large bowl, and top with the cracked eggs, batter, green onion, beni shoga, sakura ebi and tenkasu. DO NOT MIX THIS UP until right before you’re ready to put it on the hot griddle- you don’t want the liquid in the batter to deflate the crunchy tenkasu and make it soggy. The tenkasu is there to lighten up the okonomiyaki; if the batter is mixed ahead of time you’ll wind up with an end product that’s too dense.
- Add any chopped fillings you’re using (shrimp, squid, etc.) right to the bowl with everything else, but if you’re using any sliced bacon or pork, cut into 2″ to 3″ strips and reserve on a separate dish to put on top of the ‘pancake’ during cooking.
- Heat a nonstick or cast iron griddle or large frying pan over medium high heat.
- When the griddle is hot (approx. 430 deg. F or 220 deg. C), use a spoon to mix together the ingredients in the bowl, scooping from the bottom to the top in order to thoroughly combine everything. Lightly oil the griddle with vegetable oil (cooking oil spray like Pam is fine, or coat a paper towel with vegetable oil and use tongs or chopsticks to grease the griddle with the oiled paper).

- Turn the mixture out onto the griddle in whatever sizes you like (large for dinner, mini for bento lunches, or a combination for both), keeping them about 1.5″ thick. Use the back of the spoon to gently pat the mixture down and spread it out into a circle, tidying up any stray cabbage bits. If using bacon or sliced pork as a topping, lay several on top of the pancake, and top with katsuobushi. The katsuobushi topping is optional, but I find that it’s helpful to deliciously protect lean pork or bacon rashers that don’t need to render as much fat as regular bacon.
- Leave the pancakes alone until they’re lightly browned on the bottom. Gently flip them over, using two spatulas at once if the pancakes are large, and reduce heat to medium-low. Leave them alone for 5 minutes to allow the cabbage to cook through — don’t move them as they’re very delicate at this stage and will break apart.
- Once they’ve developed a nice golden brown crust on the bottom, flip them over once again and cook until the bottom is nicely browned.
- Remove to a plate and serve immediately, then sauce as you like at the table. The most basic condiments would be okonomiyaki sauce, aonori and katsuobushi, but many like to put a little Worcestershire sauce on the okonomiyaki first and top it all of with a squeeze of Kewpie mayonnaise. If you topped the okonomiyaki with katsuobushi during cooking, you might want to cut back or eliminate additional katsuobushi topping at the end.


Recent Comments
Poll: What bento information interests you? (29)
Jenifer |
FAQRichard Malakuskie | The Nerdie Birdie | Shaking up the Lunch Routine: Popcorn with Toppings - Popcorn Blog | Justin Wright |
Oshibori: We don’t need no stinking wet wipes!Daniel |
Homemade gnocchi box lunches (22)Lisa |
Guide to choosing the right size bento box (82)Julie |
Confessions of an ostrichBernice |
Top Tips (4)miamidish.net | Cheap Seat Eats |
How to make Spam Musubi (69)Scratching Ramen |
School auction bentos with stuffed mushrooms (8)Marci |
Speed Bento: leftover storage and portion guidelinesAdverbios de tiempo |
Fried Shrimp Bentos: Simple vs. Fancy (43)Mimi |
Fruit cup jello jigglers in everyday containers (42)Madison Moms Blog |