
Review: Kids Konserve metal lunch kit
I know some of you are looking for alternatives to plastic bento boxes because of concerns about the health effects of food packed or heated in plastic, so I’ve been playing around with metal bento containers. Most multi-tier latching tiffin tins are plain-looking and too big for a one-person bento-style lunch, so I was pleased to find a smaller metal alternative with a dash of style, from Kids Konserve.
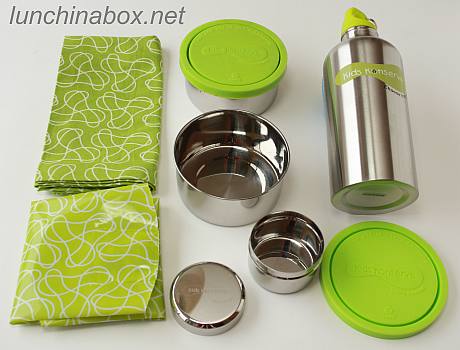
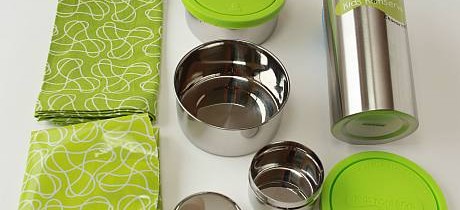
I tried out their green lunch set, which consists of a cloth napkin/placemat, two 250ml stainless steel bowls with green plastic lids, a drink bottle, a reusable sandwich wrapper, and a cloth carrying bag with handles and a velcro closure (shown below). I was also curious about their smaller, all-metal 80ml condiment containers, pictured above at the bottom/middle. I had a few questions and concerns going in, namely about how watertight the containers were and how well the sandwich wrapper would work. (Read on for the full review and a sample lunch packed inside.)
The green lids for the main containers are quite thick, BPA-free, and dishwasher-safe. Both large and small containers are mostly, but not 100%, watertight. To test them out I filled them with water and shook them around. Light shaking was fine, but a few drops came out when I turned the containers on their sides and shook hard. Still, they’re secure enough to hold moist food without leaking. If I were confident that the lunch would be carried and stored upright until eating, I’d be okay packing even stew, yogurt or other liquidy foods in the containers.
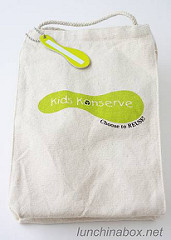
The canvas carrying bag has a strip of velcro along the top and short string handles. Four-year-old Bug complained that the string handles hurt his hands when the bag was packed with a full drink bottle, so a little quibble there. It’s got a cute metal tag to write your name on, but that’s easily removed by people with sticky fingers, so best to label the bag and containers more permanently if there’s a potential theft problem where lunch is stored. Don’t laugh! I’ve heard of ID tags being torn off of cool lunch bags even at tony private schools, and the parents later spying the stolen bags being used by other children. (Grrr.)
The canvas bag isn’t insulated, though, so I wouldn’t pack highly perishable foods like yogurt inside as it’d come to room temperature quickly. Pack the containers inside an insulated bag with ice packs, or pack non-perishable foods in the regular cloth bag, and you’re fine. For more guidance, see my post on food safety for packed lunches.
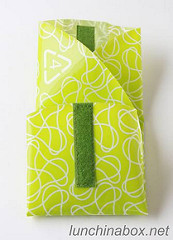
The Food Kozy shown above is basically a reusable sandwich wrapper with a velcro closure that’s designed to replace plastic bags, plastic wrap, or aluminum foil. Handwashing and air drying is recommended. I liked the concept of this (hey, less plastic in the landfill? What’s not to like?), but found it a bit stiff when wrapping soft sandwiches. I think I’ll continue to use collapsible sandwich cases or bento boxes to reduce bread squishing when packing sandwiches, but I could see it as being a green alternative to plastic wrap for bulky, dry foods like bagels.
The kit (minus the condiment container) goes for US$40, and a set of four metal condiment containers is US$15 on the Kids Konserve store (if you need international shipping you can order them here from Nubius Organics). The company also puts out cuter versions with butterfly or caterpillar designs for US$42.
(Disclaimer: I am not affiliated with Kids Konserve, but the Nubius Organics link is an affiliate link that supports Lunch in a Box at no added cost to the buyer.)
* * * * *
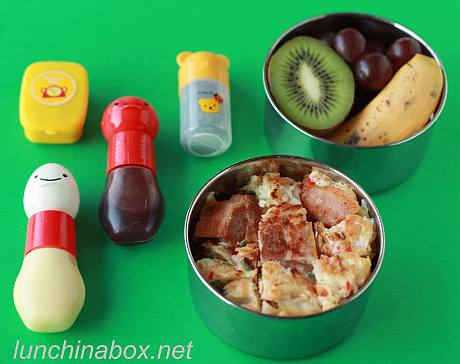
Contents of preschooler bento lunch: Mini okonomiyaki (Japanese cabbage “pancake” with shrimp and bacon in this case, made with my recipe), condiments for the okonomiyaki (okonomiyaki sauce, Kewpie mayonnaise, katsuobushi bonito flakes, and aonori seaweed flakes), mini banana, red grapes, and kiwi.
Morning prep time: 5 minutes, using leftover okonomiyaki that I made in smaller sizes with excess from dinner. In the morning I cut the okonomiyaki into bite-size pieces, filled the condiment containers, and cut the kiwi in half.
Packing: The mini okonomiyaki were just the right size to fit into the little round containers, but cutting them in the container when eating is unwieldy for a four-year-old. I cut each into nine pieces and stacked two okonomiyaki on top of each other. I usually peel kiwi and cut it up into bite-size pieces for Bug, but decided to go plain with it simply cut in half. I should have gone ahead and cut it up, though, as Bug had problems scooping the kiwi out with his spoon. I used flip-top squeeze bottles for the mayo and okonomiyaki sauce, a little furikake shaker from Ichiban Kan for the aonori, and a little condiment cup for the katsuobushi. (Shopping note: Ichiban Kan recently announced that they have expanded their shipping area to include Alaska, Hawaii, and APO/FPO addresses.)
Verdict: Too big — Bug only ate the okonomiyaki, a few bites of kiwi, and a few grapes. He ate the banana and the rest of the grapes at the playground after school as a snack.
FURTHER READING:
- Six ways to make sure your lunch gear comes home
- Bento FAQ and Biggie’s list of top speed tips, tutorials and reviews


