

Kitchen Reorganization Series: The rest
In other news, this weekend I finished the surprisingly challenging task of switching the site over to a new hosting company, which should hopefully eliminate most of the downtime issues we’ve been experiencing lately. Please e-mail me at lunchinabox (AT} gmail DOT com if you find something on the site not working correctly, and I’ll get it fixed.
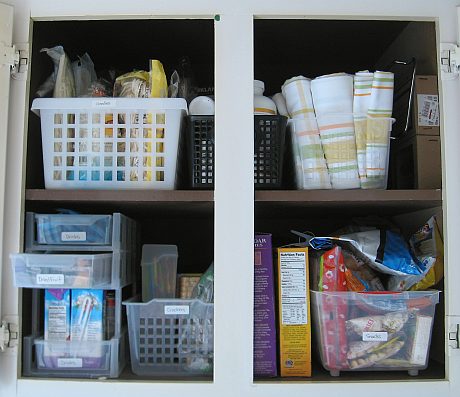
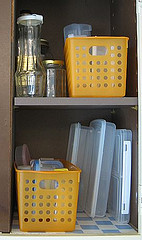
The cabinet above my wall ovens used to be a jumble of snacks, crackers, and seldom used serving platters and kitchen appliances. Getting at anything in the back of these deep cabinets used to involve a ladder and significant time rooting around, pulling out little boxes and foodstuffs and putting them on the kitchen table. The problem wasn’t as much things falling out as general disorganization and difficult access to anything not in the front of the high cabinets.
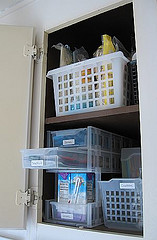
To tackle this, I used organizing baskets to group like items together. On the top shelf, noodles went into one basket, vitamins in another, and rolled-up kitchen towels in a third. The bottom shelf is more of a a kid snack and packed lunch area for my preschooler’s food: organizing baskets hold snacks and individual furikake packets, and a nifty freestyle stacking drawer system holds powdered drink packs, dried fruit strips, and juice boxes on the bottom. (Click any photo for a larger view.)
The drawer tiers come apart and can fit on top of another set of drawers either directly or on supports, so it’s a pretty flexible setup. I initially bought three separate tiers (shown assembled here) at Ichiban Kan to see if they would fit into my spice cabinet, but they were just a little too long to fit. (This highlights the need to measure your cabinets before you shop for baskets or other organizing equipment!) I’ve also seen these at Daiso in a tan color, although Ichiban Kan appears to be out of stock at the moment.
Sources: I bought most of the organizing gear in this post from Ichiban Kan in San Francisco and Daiso in Daly City, both discount stores with a lot of Japanese kitchen and bento items. Ichiban Kan has multiple branches in the San Francisco Bay Area, as well as an online store that ships within the U.S. (check out their Kitchen Organizers, Plastic Basket Storage, and Bento Lunch Box Sets, most of which are priced at US$1.50). Daiso has branches internationally and along the West Coast of the U.S., but no dedicated online store that I’m aware of. I’ve written up local Bay Area Daiso stores here at the SF Bay Area shopping guide for bento gear. Disclaimer: I have no commercial affiliations with either Ichiban Kan or Daiso.
Verdict:
- This is a definite improvement over the old mess. The little stacking drawers lift all the way out easily, making it easy to lift one out and sort through it down where I can see everything.
- My husband appreciates the basket full of kitchen towels, as these used to be just a stack in the same cabinet area that blocked access to things in the back. The one thing I wound up changing is switching the position of the vitamin basket and the towel basket, as we need to grab the vitamins more often than the kitchen towels. Best that they not be stuck behind the cabinet’s center column (irritating).
* * * * *
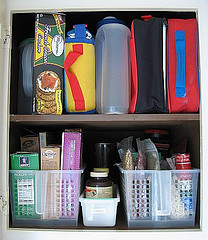
Deep, High Cabinet: This is another deep, high cabinet that posed the same problems as the first cabinet above. On the top shelf I put insulated lunchboxes and drink pitchers in front of a huge wooden salad bowl that I use only occasionally. The bottom cabinet holds a basket with salts and grains, a second basket with additional vitamins, and a third basket with dried beans and pulses. The two large baskets have little wheels on the back and a handle in the front, making it easier to drag a heavy basket out. Behind the baskets are more serving dishes that I don’t use very often.
Verdict: Thumbs up as the bottom shelf used to be a mess, and now I can just lift a basket out to quickly browse the contents or access serving dishes in the back.The top shelf is pretty much unchanged from before.
* * * * *
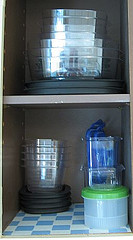
The Tupperware Zone: This used to be a truly hazardous area for my husband. This is where unorganized and mismatched food containers and a mountain of jars/bottles went to die, or lay in wait for the unsuspecting to open up the cabinet doors. Then: POUNCE! Fall out onto the counter, the person’s head, the stovetop, or whatever was around.
- To organize, I first went through and reduced the number of containers crammed into this cabinet, just keeping a small variety upstairs in the kitchen. Problem’s half solved already.
- Tiny food containers are now easily accessible in pull-out organizer baskets instead of getting stacked up loose, just waiting to fall over. This way when I need a small food container, I can pull out the whole basket and browse them easily without fiddling with a ladder or causing a Tupperware avalanche.
- I replaced my old “set” of mismatched, stained Tupperware with a new set of Rubbermaid food containers
that nest & stack compactly (I picked up the set cheap at Costco). The old Tupperware went downstairs into basement storage, and still come in handy when I want to send dinner party leftovers home with friends. That way I don’t lose my good containers, and don’t need to spend money on those lightweight Take & Toss disposable containers.
Verdict: Good. The baskets with the little containers aren’t super-organized, so it’s easy to just throw more in without feeling like I need to be all compulsive about arranging them. I think my husband is happiest about this area as things don’t fall on him anymore! At least I haven’t heard many expletives emanating from the kitchen lately…

* * * * *
There’s no good place near my prep area for full-size garbage cans, so they’re actually located across the kitchen. Unfortunately, this would mean a trip across a pretty sizable kitchen every time I need to toss something when I’m cooking, slowing me down. Solution: garbage bowl equivalents for compost, recycling, and plastics that I can empty into larger garbage cans when I finish cooking.
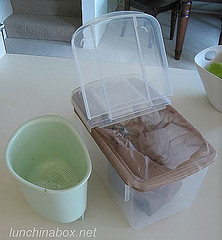
Countertop Compost Bin: The large clear plastic container on the right is actually a rice storage box with a hinged lid that lifts fully off (source: Ichiban Kan, but Daiso and other Asian markets also carry them). I line this with a biodegradable trash bag and use it for compost (vegetable trimmings, paper soiled with food, etc.).
Verdict: So-so to poor, mostly due to my own laziness. I like that the lid can stay open on its own when I’m cooking; it’s easy to toss vegetable trimmings inside without messing with a lid. One drawback is its relatively large footprint: I wish this were more vertical instead of horizontal so that it wouldn’t take up as much counter space. Another drawback is that I don’t tend to throw the compost out frequently enough, and it starts to smell bad. The smell then sticks to the plastic container, necessitating thorough cleaning and soaking. What’s your favorite countertop compost container? A little metal bucket with lid? Let us know in comments!
Countertop Recycling Bin: The light green triangular bin on the left in the photo above is actually a remnant from my years in Japan. Japanese don’t tend to have garbage disposals; instead they use these bins with small holes in the bottom, often lined with plastic mesh bags (sometimes these are built into the sink itself, with lift-out baskets that get pretty disgusting if not cleaned regularly). It’s meant to reside in the sink. Rinse plates with their scrapings right into the lined bin: excess water flows right through the holes in the bottom and retains the compost so that you can dispose of it later in the appropriate garbage container.
Here in San Francisco I do have a garbage disposal, so I used to use the green bin to hold little bits of recyclable paper and metal on the counter when I’m cooking.
Verdict: Marginal thumbs down as it took up too much counter space. I’ve recently switched to a plastic cone from Ichiban Kan that sticks to the door of my microwave oven with a suction cup. Paper and aluminum foil bound for recycling don’t tend to be wet or overly dirty, so there’s no need to line it with a bag.
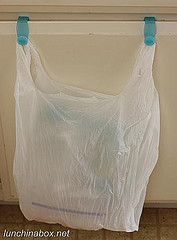
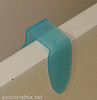
Over-cabinet Bag for Plastics: For plastics, I use a plastic bag on little hooks that fit over a cabinet door near my knees in the prep area. I got the hooks at Daiso, but you can probably find similar hooks in hardware stores or your local Target or Walmart.
Verdict: Thumbs up for efficiency, probably a thumbs down for aesthetics (which I don’t care so much about when I’m busy cooking). I can throw the whole thing away once it’s full, and it helps keep me aware of how much plastic waste my kitchen generates so I can think of ways to reduce it.
* * * * *
Unpacking Party: My friends Jennifer and Andy recently moved to a new house and threw an unpacking party, which was more fun than it sounds! With a one-week old newborn giving them two children under three, they definitely needed the help. I called dibs on the kitchen, and took a quick photo mid-unpacking. (Like the photo below from my new camera? I finally upgraded to a Canon Rebel XSi digital SLR and am currently figuring out how to use it. I still have a number of photos from my old camera to write about, though. Posts over the next couple of weeks will likely have photos from both.)
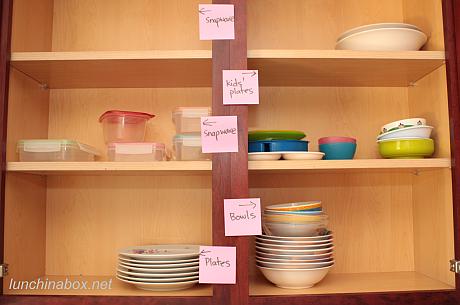
Kitchen Organizing Tip: When setting up a new kitchen (or reorganizing the one you’re in), take some time before unpacking to think about how you use your kitchen, and let that help you decide where things should go. Use Post-it notes to basically draft your organized kitchen layout and step back before unpacking anything. Is everything going to fit? Are your most commonly used things easily accessible? Have you set things up efficiently so that you won’t waste movement when cooking or cleaning? Have you gathered like items together for speed? (I set up a breakfast shelf for Jennifer with all of their cereals, toast spreads, coffees, teas, and vitamins together.)
Feel free to swap Post-It notes around before unpacking or midway through, essentially trying out different kitchen layouts. A little time spent early on planning an organized kitchen will pay off in faster prep time and less frustration down the road.
Another benefit to using Post-Its when setting up a new kitchen is that once you’ve labeled the cabinets and drawers, you can then enlist your family and friends to unpack boxes without having to personally tell them where each and every thing goes (ugh). Just put up the Post-It notes and set them loose! Stuff will get in generally the right areas, and you can fine-tune the arrangements later. Your kitchen will get set up faster with more hands helping out, and you’ll be well on your way to cooking in your new home.
Want to see more of other people’s pantries? Have a look at Lydia’s series on Other People’s Pantries on her blog The Perfect Pantry. Have you solved a kitchen organization challenge in a clever way? Let us know in comments!
FURTHER READING:
- Reorganization of lunch gear storage
- Save time & money with bento baskets for the freezer
- Get accessories under control with Ikea organizers
- Bento FAQ and Biggie’s list of top speed tips, tutorials and reviews
- All posts about organization on Lunch in a Box


Recent Comments
FAQ
Richard Malakuskie | The Nerdie Birdie | Shaking up the Lunch Routine: Popcorn with Toppings - Popcorn Blog | Justin Wright | The White Plate Kitchen |
Oshibori: We don’t need no stinking wet wipes!Daniel |
Homemade gnocchi box lunches (22)Lisa |
Guide to choosing the right size bento box (82)Julie |
Confessions of an ostrichBernice |
Top Tips (4)miamidish.net | Cheap Seat Eats |
How to make Spam Musubi (69)Scratching Ramen |
School auction bentos with stuffed mushrooms (8)Marci |
Speed Bento: leftover storage and portion guidelinesAdverbios de tiempo |
Fried Shrimp Bentos: Simple vs. Fancy (43)Mimi |
Fruit cup jello jigglers in everyday containers (42)Madison Moms Blog |