
Kimchi fried rice lunch & recipe
Fried rice is standard “refrigerator velcro” dinner in my house, using up all sorts of leftover meats and vegetables that might otherwise be forgotten and go bad. A number of readers have asked for my recipe for kimchi fried rice, so last week I got out the scale and measuring cups and took notes on what I put into my free-form fried rice. When I make rice, I always make extra to either freeze for bento lunches or refrigerate for fried rice. Feel free to stray from the master recipe below and use whatever you have on hand; this is an easy way to get lots of vegetables into your family (not quite stealthily enough for seriously picky eaters, but deliciously at any rate).
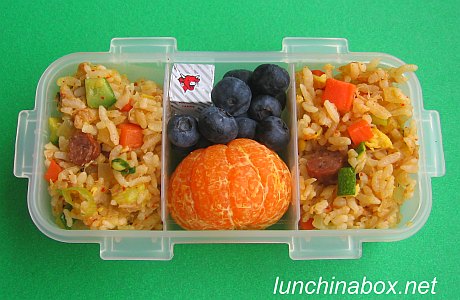
Contents of preschooler lunch: Tangerine, blueberries, cheese cubes and kimchi fried rice with zucchini, carrots, carnitas, and cocktail sausages leftover from testing for my “octodog” (hot dog octopus) tutorial. Recipe for the fried rice follows.
Morning prep time: 5 minutes, using leftover fried rice. In the morning I warmed the rice in the microwave to restore texture, and peeled the tangerine. Very fast. (Read on for lunch details and the fried rice recipe.)
Packing: Because fried rice is loose and can move around in a lunch container, I used a subdivided 350ml box from a Lock & Lock lunch set, and included a spoon in Bug’s lunch bag for easy eating. The subdividers come all the way up to the lid, keeping the rice in place. For visual balance, I made the center compartment the focus with colorful fruit, and put the rice on either side. Cheese cubes act as gap fillers.
Verdict: Pretty good. Bug ate all of the fried rice, cheese cubes and some of the blueberries at preschool. He ate the rest as a snack at the playground afterwards.

Biggie’s Kimchi Fried Rice (Bokumbop)
(makes 6 servings)

- 2/3 cup pork or beef, chopped into bite-sized pieces. I used a mixture of leftover carnitas braised pork and cocktail sausages here — I like the combination of pork and kimchi. This is also delicious with bacon (shown here), and I’ve even been known to make it with Spam (shown here and at right) or fish cakes.
- 1 Tb vegetable oil
- 1 large carrot, diced (about 4 oz or 120g)
- 1/2 onion, diced (about 5 oz or 140g)
- 1 large zucchini, diced (about 4 oz or 110g). I often use chopped bell peppers instead of zucchini.
- 5.5 oz mushrooms (160g), sliced. I used enoki mushrooms here, cut into one-inch lengths.
- 2/3 cup kimchi (about 4.5 oz or 125g) or more, sliced. I like to use common cabbage kimchi for this, but I’ve also used daikon cube kimchi (ggakdugi, sliced) to good effect.
- 5.5 cups leftover cooked white or brown rice (about 750g). You’ll get good results from using rice that you’ve refrigerated, breaking apart large clumps of rice beforehand. (I store my refrigerated rice in a gallon freezer bag, making it easy to break up with my hands by squeezing the bag. Rice of any length grain is fine for this — it doesn’t have to be the sticky short-grain rice you use for onigiri rice balls.)
- 3 large eggs, beaten
- 3 green onions (scallions), sliced thin
- 1/4 cup stock (chicken stock, dashi bonito stock, vegetable stock — choose your favorite. I used instant hon dashi granules dissolved in water, but I’ve also got a freezer bag filled with homemade chicken stock frozen in ice cube trays for just this sort of thing.)
- 1 Tb or more hot pepper paste (kochujang or chogochujang), to taste
- 1.5 Tb soy sauce
- ground toasted sesame seeds to taste (see Note)
- sesame oil (to taste)
- If you’re using a meat that needs cooking (like chopped bacon, raw pork/beef, or Spam), heat a wok or large frying pan over medium heat and cook the meat until done. Use a little oil and season raw pork/beef with salt and pepper for a flavor boost; bacon and Spam don’t need extra oil or spices. Remove the meat to a separate dish and pour off any rendered fat.
- In a small bowl, combine the stock, hot pepper paste and soy sauce, and set aside. If you want a sour element to your fried rice, add a tablespoon of the kimchi pickling liquid to the bowl.
- Heat a wok or large frying pan over medium-high heat and add the vegetable oil. Add the hard vegetables (carrot and onion) and stir-fry for 2-3 minutes. Add any soft vegetables like the zucchini and mushrooms, and cook for an additional 2-3 minutes until soft.
- Add the kimchi and cooked meat to the pan, and stir to combine. Add the stock, hot pepper paste and soy sauce mixture, and heat until simmering to season all of the vegetables and meat.
- Add the cold rice to the meat and vegetables in the pan, and stir well to combine. Fry for 2-3 minutes, until the rice is warm.
- At this point, you can either remove the rice to a separate dish while you cook the egg and green onions, or just push the rice over to one side of the pan to make room for scrambling the egg. To save time, I do the latter.
- Pour the beaten eggs and half of the green onions into the empty portion of the pan and stir until almost thoroughly scrambled. Stir into the fried rice, which will now have a little crust developing on the bottom (mmm, o-koge!)
- Remove from heat, and stir in the remaining green onions, ground sesame seeds, and a drizzle of sesame oil for fragrance. Taste it and see what you think. If it needs a little more flavor, add salt and pepper, a bit of soy sauce, or more kochujang. Serve hot.

Variations: There’s nothing particularly sacred about this combination of vegetables. Onions, kimchi, egg and green onions are probably the bare bones, but look at this dish as a willing recipient of stray vegetables, particularly bell pepper. If you’re feeling energetic, you can wrap it inside a thin layer of egg crepe for a little “omu-rice” shown at right with mini apple bunnies).
Note: I keep a cheap sesame grinder filled with toasted sesame seeds in my cupboard; you can either buy pre-roasted sesame seeds cheaply in Korean markets or toast your own in a sesame seed roaster or in a frying pan over low heat, covered with a splatter screen (keep moving the pan around to keep them from burning). Grinding the toasted sesame seed releases their flavor; you can also grind these manually in a mortar and pestle.
FURTHER READING:


