Outsmarting seafood allergies and a how-to on Faux Roe
An allergy to seafood can be a bit of a hindrance to an Asian food enthusiast. I’m lucky enough to be allergic to both fish and shellfish, with effectively rules out almost all restaurant sushi (even the vegetarian types are often made with the same tools and can be tainted with juices), not to mention those adorable kamaboko (sliceable fishcake logs, often featuring patterns of flowers or anime characters). This can really cramp a person’s bento style, so I’ve had to find ways to work around it.
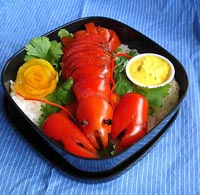 This “mock lobster” is a Roma tomato salad served on a bed of jasmine rice. Unless it’s tomato you’re allergic to, this guy can’t give you hives. :-) The eyestalks are removable cloves dabbed with a bit of black decorating gel, the ornamental rose is some carefully-cut yellow cherry tomato, and the “butter” off to one side is a dressing I made of hard-boiled egg yolk, mayonnaise, and mustard. He’s not the only shellfish I’ve faked; I’ve also conserved a couple of shreds of canned chicken breast, tinting them red before adding them to my chicken salad. The result looks very much like crab salad. Kamaboko can be faked with a shaped chunk of lemon-brushed apple, dipped in red juice or food coloring, rinsed, and sliced. All you have to do is figure out to manipulate what you can eat to resemble what you can’t, so you don’t feel so deprived.
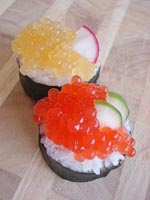
I’ve always been in awe of the beauty of sushi. Maybe it’s the allure of something unattainable, I don’t know. I’ve hovered around the sushi section of Jungle Jim’s, gaping at the glistening roe and trying to imagine what it might taste like. There are some chefs who have pioneered artificial caviar by using squid ink (which doesn’t really help those of us with allergies) and juice-based roe that gloms together with the use of calcium chloride. None of these methods seem particularly cheap or easy. It took some experimenting, but I’ve found that there is a way to incorporate the beauty of roe sushi into a bento without the actual fishiness, using about $5(US) worth of common grocery-store ingredients.
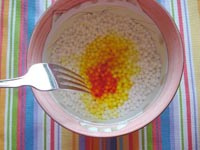 First off, you’ll need a bag of dried small-pearl tapioca. This is usually found in the baking aisle of most grocery stores, near the boxed pudding mixes, and can be had for about $3 US. Soak about 1/4 cup of it overnight in the liquid of your choice, covering with some plastic wrap. Here I used water and added yellow food coloring, but I advise experimenting with fruit and vegetable juices instead. The main reason for this is that…well, tapioca doesn’t taste like much. You can add sweetener and candy flavorings to the water (or, if you’re brave, soak the tapioca in Kool-Aid), but the natural sweetening and flavoring the tapioca absorbs from juice tastes so much better. Any flavoring and sweetness you add will come through as light and subtle in the final product- don’t expect a strong burst of flavor. Think of it more like rice with a light hint of fruit to it.
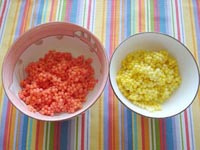
After the tapioca has been soaked overnight, drained and rinsed, it will look like this. Don’t be thrown off by the opaqueness and pastel tones…that will all change when the tapioca is cooked. Although it’s technically edible, if you were to pop one of these in your mouth at this stage it would be a weird combination of wet and powdery. It’s not pleasant. Care to ask me how I know that? ![]()
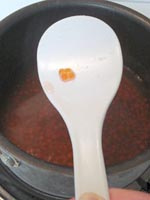
Transfer your tapioca to a saucepan of water or, if you’d like to add additional flavor, two parts water and one part juice (the same kind you used for soaking). Cook according to normal Pudding Protocol (temperature medium-low, keep a close eye on it, stir constantly). As the tapioca cooks, it will slowly become transparent from the outside in, as you can see here. I stirred with a white rice paddle because it was easier to keep track of the change that way.
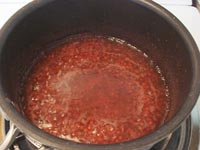 When the liquid begins to take on a texture like boiling gelatin and the majority of the tapioca pearls are transparent, you can take it off the heat. Cool for a few moments, stirring periodically, and then strain with a metal sieve. As you’re straining, run cool water over the tapioca to rinse it and bring the temperature down. Don’t worry…there’s still enough starch to make it stick together. More than enough, as you’ll learn shortly.
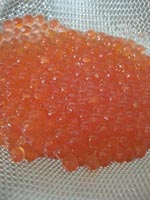
This batch of tapioca-roe has just been rinsed and is cooling in the sieve. You can see that, although it’s transparent, it really did pick up the color well. If you don’t rinse it, the tapioca gums together and becomes impossibly sticky. Even after rinsing, you’ll be able to spoon up big glops of it and they won’t fall apart. At this point, it’s ready to add to your sushi. And yes, it’s safe to take an experimental taste. Softer than a gummy bear, with a very light hint of fruit or veggie flavor if you’ve soaked it in juice.
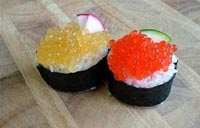
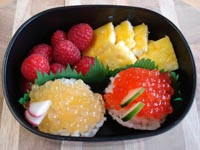
Here I’ve added a teaspoonful of the faux roe to the top of some basic rolled sushi. You could add fruit to the centers of the rolls to accent the flavor of the roe if you like. I decorated the yellow “flying fish” roe with some fans of radish and the orange “salmon” roe with cucumber.
And there’s the inclusion of roe sushi into your bento… totally fish-free.
FURTHER READING:
- All posts by Amorette on Lunch in a Box
- Decorative Food recipes
- Bento FAQ or Biggie’s Top Speed Tips


Recent Comments
FAQ
Richard Malakuskie | The Nerdie Birdie | Shaking up the Lunch Routine: Popcorn with Toppings - Popcorn Blog | Justin Wright | The White Plate Kitchen |
Oshibori: We don’t need no stinking wet wipes!Daniel |
Homemade gnocchi box lunches (22)Lisa |
Guide to choosing the right size bento box (82)Julie |
Confessions of an ostrichBernice |
Top Tips (4)miamidish.net | Cheap Seat Eats |
How to make Spam Musubi (69)Scratching Ramen |
School auction bentos with stuffed mushrooms (8)Marci |
Speed Bento: leftover storage and portion guidelinesAdverbios de tiempo |
Fried Shrimp Bentos: Simple vs. Fancy (43)Mimi |
Fruit cup jello jigglers in everyday containers (42)Madison Moms Blog |