
Burgers in flowerpot smoker, recipes
Last year for Father’s Day I made my husband a claypot “flowerpot smoker” as shown on Alton Brown’s TV show “Good Eats”. It’s basically a makeshift insulated smoker that could easily cost US$1000 if you bought a Kamado or Big Green Egg ceramic smoker- the benefits of this general type of smoker are the heat retention and ability to cook at low temperatures for extended periods of time (think pork butt) or super-high temperatures. We pulled it out for that classic Fourth of July meal: hot dogs and hamburgers, with a smoky twist.
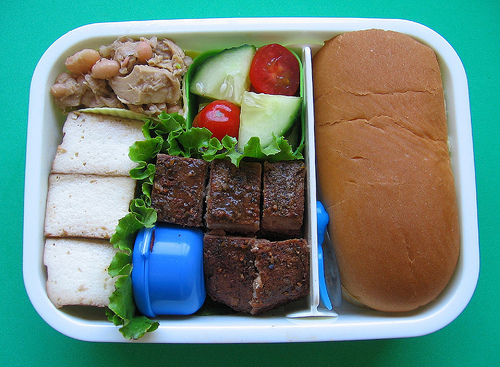
Contents: Tuna and bean salad with vinaigrette (recipe below), marinated cucumber and tomatoes in ponzu-sanbaizu dressing (recipe below), tangerine teriyaki tofu, smoked hamburger and barbecue sauce in container, and hot dog bun. I wound up putting the burger pieces, lettuce and barbecue sauce in the hot dog bun, and eating it like a sandwich.
Morning prep time: 8 minutes, using leftover smoked hamburgers and tuna/bean salad. The tofu (leftover from grilling) was already prepped and marinating in the refrigerator; I just quickly pan-fried it to give it a nice sear. While that was on the stove I quickly sliced and dressed an English cucumber and some cherry tomatoes, and filled the sauce container.
Packing: I used lettuce as an edible divider around the smoked hamburger, and cut both hamburger and tofu into bite-sized pieces as it’s difficult to cut things already packed up in a lunch. A reusable silicone mini muffin cup holds the tuna & bean salad, keeping the vinaigrette from mingling with the tofu. Packed in my 500ml Leaflet box, there’s also a little pick for the tofu and cucumber/tomatoes, and a little clear spoon for the tuna/bean salad.
Cooking: Both hamburgers and hot dogs were wood-smoked for an hour in our flowerpot smoker (details below), with guidance from recipes in the informative barbecue cookbook Smoke & Spice: Cooking with Smoke, the Real Way to Barbecue by James Beard Award-winning authors Cheryl and Bill Jamison. This is the fastest thing we’ve ever smoked; the pork butts below took 15 hours last year! The smoked hamburger was a standout, with seasoning mixed in, a dry rub on the outside, and a mop sauce during cooking. My lord, they were tasty!

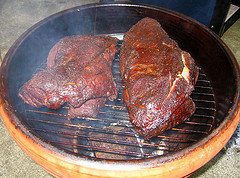
Equipment: After watching the Q episode of Alton Brown’s Good Eats analytic cooking show last year, I got out my tape measure and went to the hardware store to duplicate his flowerpot smoker setup. It consists of two large terra cotta flowerpots (one for the base, one for the lid), three bricks to mount it on, an electric coil burner in the bottom, a metal pie pan on the burner, a circular grill set inside the main pot, a grill thermometer set in a drainage hole in the top, little dishes to cover (or vent) the additional drainage holes, and a probe thermometer snaking in the top to measure the internal temperature of the meat. You throw some dry wood chips onto the pie plate set on the electric coil burner, put in your meat, and monitor the temperature. We’ve also used it for pork butt, chicken, and maybe ribs (have to ask my husband the BBQ authority if we actually used the smoker or just smoked it on the grill).
Advantage: Price! I put this together for about US$70, so it’s a cheap entry point to insulated smoking. Because it retains heat, it can barbecue at low temperatures (200-230 deg. C) over long periods of time.
Disadvantages: The $10 electric coil burners tend to die after a few extended uses, and lifting the lid to add more wood chips is unwieldy when hot. With the coil burner control being inside the pot, temperature can be challenging to regulate. The smoke residue builds up over time, so the insides of the pot should either be treated for easy cleaning or lined with aluminum foil. We haven’t done either and our burner just died, so we’re now considering next steps (replace the burner and clean the insides, smoke in our charcoal grill, look for a ceramic smoker, get a regular smoker?). One thing’s for sure, though: we love the results of low and slow smoking over wood.
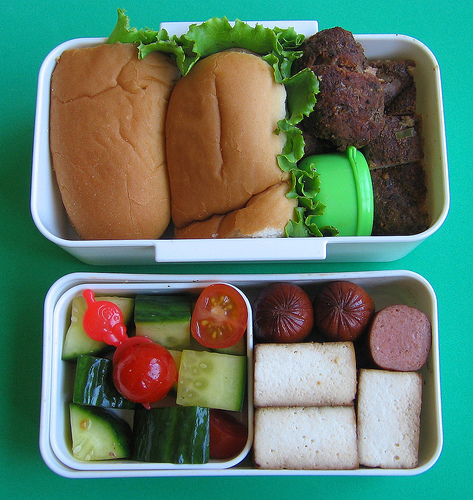
Contents of Bug’s meal: Same as mine, but with the addition of smoked hot dogs. These were okay, but nowhere near the flavor heights of the smoked hamburgers, which were fantastic and worth doing again. Packed in a 600ml two-tier Basis 1 box with a deep bottom tier for the hot dog bun. This lunch was too big for two-year-old Bug; he left one of the buns and half of the hamburger (which I then ate).
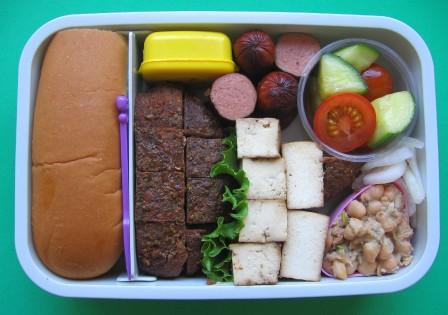
Contents of husband’s meal: Same as ours, with the addition of some leftover sliced onions that acted as gap fillers to stabilize the meal for transport. The onions were for the do-it-yourself sandwich.
Packing: I packed the marinated cucumber and tomatoes in a disposable plastic food cup with lid to contain the dressing (often sold in bulk at restaurant supply stores like Smart & Final). Packed in a 810ml Clex box by Asvel, good for big appetites according to the bento box size guidelines.
Ponzu-Sanbaizu Salad Dressing
- 2 parts sanbaizu (simple recipes here)
- 2 parts ponzu
- 1 part sesame oil
- 1 part extra-virgin olive oil
- salt and pepper to taste
- toasted sesame seeds, crushed (optional)
Combine all ingredients, shake.
Tuna and White Bean Salad
SPEED TIP: You can speed this up significantly for rushed mornings by using a bottled vinaigrette or Italian dressing. Just add it to beans and tuna, mix and pack!
- 1 can (15 oz.) white beans (you can also substitute pinto beans, pink beans, etc.)
- 2 Tb red wine vinegar
- 1 Tb balsamic vinegar (optional, but fabulous)
- 2 Tb extra-virgin olive oil
- 1 garlic clove, minced or put through a garlic press
- 1/4 tsp dried oregano or 1/2 tsp fresh
- 1/4 cup red onion or shallots, chopped and rinsed to “deflame”
- salt and pepper to taste
- 1 can (6.5 oz) tuna fish, drained
- Drain and rinse beans in cold water. Drain.
- In a medium bowl, make a vinaigrette with the vinegars, oil, garlic, oregano, onion, salt and pepper (mix well).
- Add drained beans and rinsed red onion to the vinaigrette, stir to coat.
- Break up the tuna into smaller chunks, and toss with the beans. Serve.
RELATED POSTS:
- Flowerpot smoker debut, and pulled pork lunches
- Biggie’s list of Top Speed Tips, tutorials and equipment reviews
- Need for speed: A mommy’s lunch manifesto
- How to pack a bento lunch and use “gap fillers”
- Choosing the right size bento box
- DIY: Make egg molds out of widely available ice cream sandwich molds


